
Vape Tool Kit – DIY Coil Building Kit
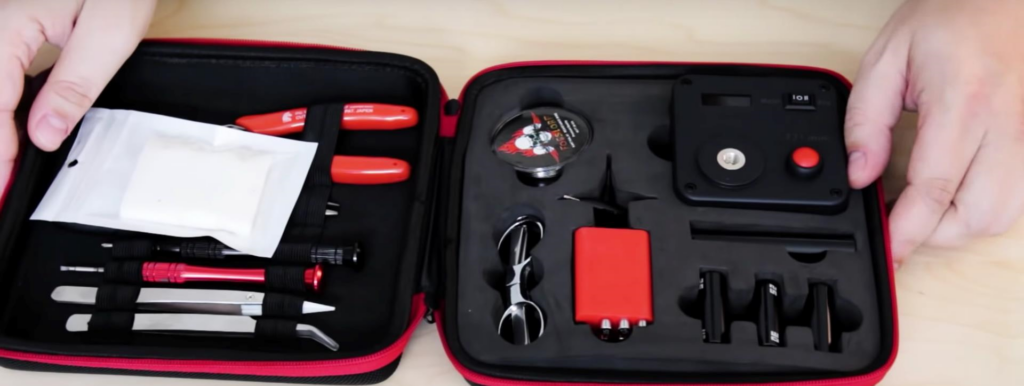
There’s an old line that a poor carpenter blames his tools. Coil building is one hobby where the tools really do make a difference, though. Building your own coils can save you money on pre-made coil heads and lets you fine-tune the warmth, vapor and flavor of your vape, but it’s hard to do well without the right gear.
If the idea of building feels overwhelming, a DIY coil building kit takes a lot of the guesswork out of it. Here’s what a typical kit includes, what each tool does, how to choose one and how the tools come together in a build.
Prefer to watch? In our Vape School video, Ian gives an overview of the typical tools, using the V3 version of Coil Master’s DIY kit as the example. Watch ZampleBox Vape School videos on YouTube.
Short version: A DIY kit bundles the core coil-building tools in one case: something to wrap coils around, tweezers (ideally ceramic), cutters, pliers, small screwdrivers and scissors. Some kits add an ohm reader; if yours doesn’t, buy one, because it’s the tool that matters most for building responsibly.
Why build your own coils?
- Lower running costs. A spool of wire and a bag of cotton go a long way compared with buying packs of pre-made coils.
- Control. You choose the wire, the number of wraps and the resistance, so you can tune the vape to your taste.
- Flavor. A fresh build with fresh cotton brings out the best in your favorite vape juice.
Building means working with rebuildable atomizers, such as RDAs (rebuildable dripping atomizers) and RTAs (rebuildable tank atomizers). If those are new to you, start with our guide to the anatomy of an RDA.
What’s in a typical DIY kit
Kits vary by brand and version, so always check the listing, but most include some combination of the tools below.
A coil jig or winding rods
A jig, or a set of rods in different diameters, helps you wrap coils with a consistent inner diameter, so the two coils in a dual build come out matching. Plenty of builders also use the shaft of a small screwdriver.
Tweezers
Straight and curved tweezers help you position coils and tuck cotton into place. Ceramic-tipped tweezers are the ones to look for: they don’t conduct electricity and they handle heat, so you can use them to pinch and adjust a coil while pulsing it at low power. Never use metal tweezers on a firing coil.
Cutters
Flush or diagonal cutters trim coil legs close to the posts, so no stray wire can touch the deck and cause a short.
Pliers
Needle-nose pliers grip wire, bend legs into position and pull out old builds.
Screwdrivers
Small flat, Phillips and hex (Allen) drivers fit the tiny post screws found on most rebuildable decks.
Scissors
Sharp scissors give you clean cotton cuts, which help the wick fit snugly and feed juice properly.
An ohm reader
An ohm reader shows the resistance of a build before it ever goes on your mod. It’s the single most important building tool, especially if you use a mechanical mod with no built-in protection. If your kit doesn’t include one, add one.
Wire, cotton and a case
Some kits also include a starter spool of wire, some cotton and a zippered case to keep everything together. For a closer look at individual tools, see our guide to the perfect vape tool kit.
How to choose a kit
- Look for ceramic tweezers and an ohm reader. These two tools do the most for build quality and for building responsibly.
- Check the jig or rods. Several sizes give you room to try different coil diameters.
- Judge the quality. Cutters should cut cleanly, and tweezer tips should meet evenly.
- Think about where you build. A compact case travels well; a bigger kit suits a bench at home.
- Read the contents list. What’s included can change between versions, so check before you buy.
How the tools come together in a build
- Wrap. Cut a length of wire and wrap it around your jig or rod with tight, even wraps.
- Install. Loosen the post screws, seat the coil legs and tighten the screws with your driver.
- Trim. Snip the legs close to the posts with your cutters.
- Measure. Check the resistance on your ohm reader. A reading that jumps around means a loose leg, and one far lower than expected can mean a short.
- Pulse and adjust. Fire the bare coil in short bursts at low power and use ceramic tweezers to even out any hot spots. Our guide on getting hot spots out of coils covers this step in detail.
- Wick. Thread cotton through the coil, trim it with scissors and tuck the tails.
- Saturate and vape. Wet the cotton with vape juice and start at a low wattage.
For the full walkthrough, follow our guide on how to build a basic coil. When you’re ready for two coils, move on to building a parallel coil.
A word on batteries
Home-built coils often come in at low resistances, and a lower resistance pulls more current from your battery. Check every build on an ohm reader, know your battery’s continuous discharge rating and carry spare batteries in a plastic case, never loose.
If you build for a mechanical mod, read mechanical mod battery safety and our recommended batteries for vaping first.
Juice for your first build
A fresh build deserves good juice. Browse our vape juice by flavor, or join the Zamplebox Club for a box of vape juice picked for your taste every month.
Common questions
Do I need a full kit to start building?
No. At minimum you need something to wrap coils around, tweezers, cutters, a small screwdriver, scissors, wire, cotton and an ohm reader. A kit simply bundles most of that into one purchase.
Why are ceramic tweezers so important?
They don’t conduct electricity and they handle heat, so you can adjust a coil while pulsing it at low power without shorting the build. Metal tweezers can’t be used that way.
Can I use a regulated mod instead of an ohm reader?
A regulated mod will show your build’s resistance, but a dedicated ohm reader lets you check and adjust a build before it touches your mod. That matters most if you use a mechanical mod.
Does building my own coils really save money?
Usually, once you own the tools. Wire and cotton cost little per build compared with packs of pre-made coils, though how much you save depends on how often you rebuild.
WARNING: This product contains nicotine. Nicotine is an addictive chemical. For adults 21+ only.