
How to Install Coils in a Goon RDA
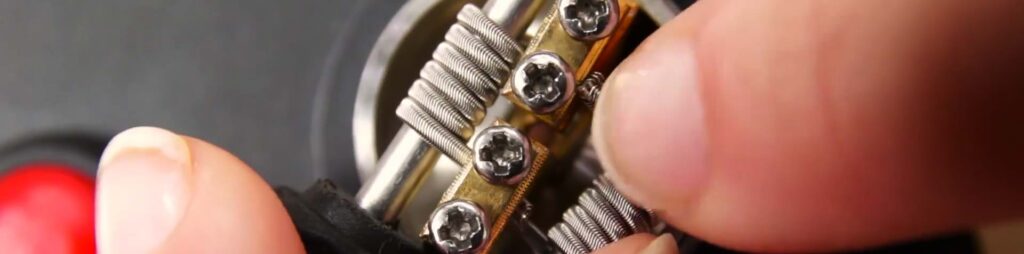
The Goon RDA has a different design from many rebuildable dripping atomizers (RDAs). Its clamp-style posts make it one of the easiest and most versatile drippers to put coils into, which makes it a good deck to learn on if the wide world of RDAs feels a little intimidating.
This quick tutorial breaks down how to install a dual-coil build in a Goon, from placing the coils to wicking them, along with the checks to make before you vape.
Prefer to watch? Watch ZampleBox Vape School videos on YouTube.
Short version: Loosen the clamps, slide each coil’s legs underneath, center the coils in front of the airflow, tighten, trim and check the resistance. Then pulse out any hot spots, wick so the cotton reaches the juice well without blocking the airflow, and start at a low wattage.
Meet the Goon
The Goon is an RDA from 528 Custom Vapes. It’s known for its clamp-style posts and a roomy deck with plenty of space to work, which makes installing coils, including thicker or more complex wire, easier than on many decks. There have been several versions and sizes over the years, so keep the manual for yours handy.
Why clamp posts are easier
On many RDAs, you thread each coil leg through a small hole in a post and tighten a screw onto it. On a clamp-style deck, you lay the leg under a clamp and tighten the clamp down on it. That leaves you free to position the coil exactly where you want it before you lock it in, with no tiny holes to fish wire through.
If you’re new to rebuildables, our guide to the anatomy of an RDA explains the parts of the deck.
What you’ll need
- Your Goon RDA and the right driver for its clamp screws
- Two matching coils, wrapped and ready (see how to build a basic coil)
- Flush cutters or wire snips
- Ceramic tweezers
- A screwdriver shaft or coil rod to help position the coils
- An ohm reader, or a regulated mod that shows resistance
- Cotton and sharp scissors
- Your favorite vape juice
How to install coils in a Goon
1. Prep the deck
Remove the top cap and put the RDA on your ohm reader. Loosen each clamp screw just enough to open a gap under the clamp. There’s no need to take the screws all the way out.
2. Place the first coil
Each coil runs from one post to the other. Slide the first coil’s legs under the clamps, one leg to each post, and center the coil in front of the airflow on its side of the deck. Keep it clear of the deck floor.
3. Tighten the clamps
Hold the coil in place with your rod or tweezers and tighten the clamp screws. Make them firm, but don’t crank so hard that you strip a screw or crush thin wire. Check that each leg sits fully under its clamp.
4. Add the second coil
Install the second coil on the opposite side the same way, mirroring the first at the same height and the same distance from the posts. Each post now holds one leg from each coil.
5. Trim the legs
Snip the excess legs as close to the clamps as you can. Make sure no leftover wire touches the deck, the other post or the top cap.
6. Check the resistance
Look for a steady reading close to your target. A jumping reading means a leg isn’t fully clamped, and a reading far lower than expected usually means something is touching where it shouldn’t. With two matching coils, expect about half the resistance of one coil on its own; our parallel coil guide explains why.
7. Pulse out hot spots
Fire the bare coils in short pulses at low power. Both should glow at the same time, from the center outward. Pinch or strum any hot spots with ceramic tweezers, then check the clamp screws again, since wire can settle as it heats. Our guide to getting hot spots out of coils has the details.
8. Wick the coils
Thread a strip of cotton through each coil so it’s snug but not tight. Trim the tails so they reach down into the juice well, fluff them out a little and tuck them in without blocking the airflow. Leave a little space under each coil so air can reach it.
9. Saturate and vape
Drip vape juice onto both wicks until they’re fully saturated, put the top cap on and set the airflow the way you like it. Start at a low wattage and work up until the flavor and warmth feel right.
Tips for Goon builds
- Keep it symmetrical. Matching coil height and placement give you even heating and consistent flavor.
- Mind the airflow. Coils that sit squarely in front of the airflow tend to give the best flavor, and wick tails that block the airflow will choke the draw.
- Don’t overdrip. Too much juice on the deck leads to spitting and leaks. Drip until the cotton is wet, not swimming.
- Clean between builds. When you re-wick, pull out the old cotton and clean the deck, and replace any coils that won’t come clean.
- Know your limits. Dual builds often come in at low resistances. Check every build against your battery’s continuous discharge rating, and read mechanical mod battery safety if you vape on a mech.
Juice for your Goon
A dripper puts the coils close to your mouth, so flavor comes through clearly. Many RDA fans like high-VG juice for fuller vapor; our guide to PG and VG explains the difference. Browse our vape juice, or let the Zamplebox Club send bottles picked for your taste every month.
-
7 Daze Red's Apple Glacial Mint - 100ml
$14.99 Select options This product has multiple variants. The options may be chosen on the product page -
7 Daze Reds Salt Series - Apple Strawberry Iced Nic Salt - 30ml
$14.99 Select options This product has multiple variants. The options may be chosen on the product page -
Air Factory Salt Blue Razz Ice 30ml Nic Salt
$12.99 Select options This product has multiple variants. The options may be chosen on the product page
Common questions
What wire works best in a Goon?
Clamp posts handle a wide range, from simple round wire to thicker, more complex coils. Start with plain Kanthal for your first builds, then experiment once you’re comfortable, rechecking the resistance and your battery limits every time.
Why is my resistance reading jumping?
A leg probably isn’t fully under its clamp, or a screw has loosened. Open the clamp, reseat the leg and tighten it again.
How often should I re-wick?
Whenever the flavor fades or you notice a burnt edge. Sweeter juices tend to gunk up coils faster, so you may need to clean the coils and re-wick more often.
Do these steps work on other RDAs?
Mostly. Building the coils, checking resistance, fixing hot spots and wicking work the same way on any RDA. What changes is how the legs are held, so follow your deck’s design for that part.
WARNING: This product contains nicotine. Nicotine is an addictive chemical. For adults 21+ only.